Gaai


Nexxtender Charger android app
The goal of this app is to control the Nexxtender Home and Nexxtender Mobile charger without requiring the Android Nexxtmove app. The Android Nexxtmove app is the official app for controlling the Nexxtender chargers and for syncing billing information to the Nexxtmove.me website for refunding. Both the Nexxtmove app and the Nexxtmove.me website require a username and password to login. Without it, it is impossible to use the Nexxtmove app and therefore impossible to operate the Nexxtender Home charger, which has no UI or input device on its own. If you no longer have a valid username and password for the Nexxtmove app, using Gaai is an option. Other alternatives are
- ESPHome BLE Client for Powerdale Nexxtender EV Charger
- Nexxtender Home Bluetooth Controller
- NEXXTLOOK
- NexxtenderBlackCable
Gaai’s source code is hosted on Github.
Gaai?
Choosing a short distinctive name for a project is always difficult. A bird name was chosen. Gaai is Dutch for the Eurasian jay.
Features
- Only requires to install Gaai.
- No additional hardware required.
- No www.Nexxtmove.me account required.
- Connects over Bluetooth Low Energy (BLE) to the Nexxtender Home or Nexxtender Mobile.
- Finds and connects to the device based on its PN and SN. No MAC required.
- Shows real time data from the Nexxtender Home or Nexxtender Mobile: device information, charging status, current, power consumption, …
- Allows to control the Nexxtender Home: start and stop the charger in ECO or MAX mode, sync the time with the mobile phone.
- Allows to configure the Nexxtender Home: default charging mode, max grid and max device current, off-peak hours.
- Management of badges (add, delete).
- Remembers the PN and SN of multiple devices.
The following features are not available:
- Synchronization with the www.Nexxtmove.me website from Diego.
- Download of Events, Metrics, charging information for billing, CDR, CCDT, …
- Firmware upload.
Installing Gaai
There are 3 ways to install Gaai on your Android phone:
- Install Gaai using APK file
- Install Gaai using Android Studio on Windows
- Install Gaai using Google Play Store
Install Gaai using APK file
For most people, this is the preferred way of installing.
An APK file generated from Gaai can be installed as described in How to install third-party apps without the Google Play Store.
Gaai APK files are available for the official releases in the GitHub repo. Select a release, open its assets and select the APK file.
If the selected APK is a -debug version, it will install without questions.
If it is a -release version, it is signed with the Gaai signature key and Android will perform some tests.
If Google Play Protect recommends to scan the app, select “scan app” and wait for the scanning to complete.
If the scanning is complete, select “Install app”.
Install Gaai using Android Studio on Windows
Gaai can be installed on your Android phone using Android Studio. See Environment setup. Only used by developers during development.
Install Gaai using Google Play Store
Once Gaai is sufficiently stable, distributing it via Google Play Store is an option to consider. For the moment it is not available.
Getting Started
Bluetooth
Gaai uses BLE to connect to the Nexxtender Home or Nexxtender Mobile, so make sure that Bluetooth is enabled on your mobile device.
In addition, Gaai requires some Bluetooth related permissions in order to function. When Gaai is ran for the first time, it will ask for the required permissions. In that case, please press the “Request permissions” button, and then press “Allow”. If you press “Don’t Allow”, Gaai will insist that it needs the permissions to continue, but recent Android versions only allow an app to ask only once for permissions. The only way out in that case is to go to Android Settings -> Apps -> Gaai -> Permissions. In the “Not Allowed” section you will find the permission “Nearby devices”: click on it and press “Allow”. You now have granted the permission.
Depending on the Android version, the following permissions are required:
- Up to and including Android 11 (SDK <= 30):
android.permission.ACCESS_FINE_LOCATION - Starting from Android 12 (SDK >= 31):
android.permission.BLUETOOTH_SCANandandroid.permission.BLUETOOTH_CONNECT
Note that permission naming is confusing in Android!
Although the Gaai application code asks for the permissions BLUETOOTH_SCAN and BLUETOOTH_CONNECT
in Android 12 and up:
- The Android pop-up where you have to allow the permissions, will ask “Allow Gaai to find, connect to, and determine the relative position of nearby devices.”
- In Android Settings -> Apps -> Gaai -> Permission the permission is named “Nearby Devices permission”.
Bluetooth pairing
The first time that Gaai connects to a Nexxtender Home or Nexxtender Mobile device, Gaai will show a pop-up asking to enter the 6-digit PIN. After entering the PIN, pairing completes.
See PIN value for the PIN value.
If the mobile phone user later removes the Nexxtender Home or Nexxtender Mobile device from the “Bluetooth” menu in Android, the pairing information is lost and Gaai will not automatically open the pairing dialog again. The only options to restore from this situation are either of:
- pair the device from the Android “Bluetooth menu”.
- delete the Nexxtender Home or Nexxtender Mobile from Gaai and then add it again. Gaai will now again ask to pair.
PIN value
The Nexxtender charger installer that installed your charger and connected it with the Nexxtmove app on your mobile phone, has paired it with the Nexxtender charger using the correct PIN value. In general, the installer will not have provided you with that PIN value. As long as you use the same mobile phone to connect to the Nexxtender charger, both devices should stay paired and there is no issue. But when you need to move to another phone, you need the PIN value. If you don’t have the PIN code, you can provide the Gaai GitHub repository owner with the PN and SN values as mentioned in Add a Nexxtender charger device and he will calculate it for you.
First start
When Gaai is started the first time, it has no Nexxtender devices in its database yet. Gaai will display a home screen like the following:
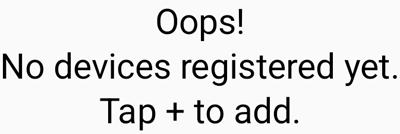
At the bottom right is a button with a “+” that allows to add a Nexxtender device.
Add a Nexxtender device
When tapping the “+” in the home screen, the following dialog box appears:
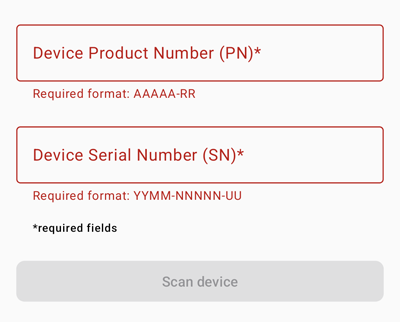
The Scan device button stays grayed out until a valid PN and SN are entered. The PN and SN of your *Nexxtender * can be found at the bottom of your device, as is shown in
 .
.
When a valid PN and SN are entered, the Scan Device button become active.
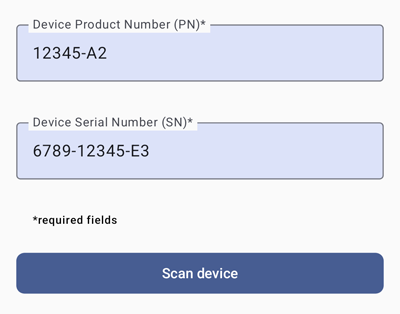
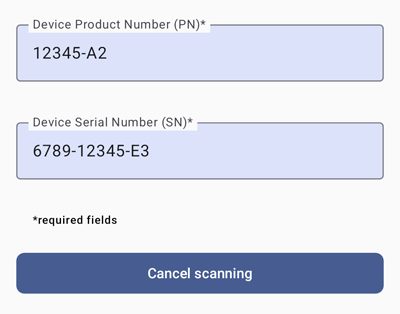
Make sure that you are close to the Nexxtender device and that no other device is connected with it over BLE. Tap the Scan Device button. Scanning will start and the button will now show Cancel Scanning allowing you to cancel the scan if it takes to long.
If you entered the correct PN and SN, Gaai should find the Nexxtender in less then a few seconds and show the following screen.
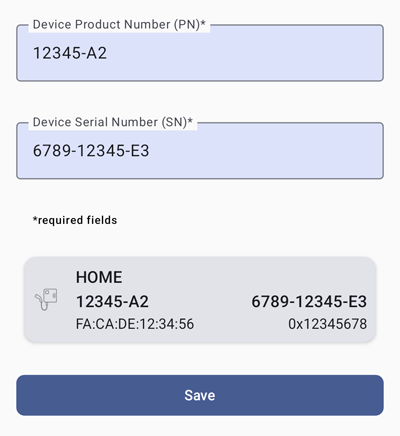
Gaai shows a card with the details of the found device.
- At the top is the type of the Nexxtender Charger: HOME or MOBILE.
- At the middle left is the PN.
- At the middle right is the SN.
- At the bottom left is the MAC.
- At the bottom right is the Service Data used to find the BLE device based on its advertisement packet.
Press Save to save this device in Gaai’s database. This will bring you back to the previous screen, now showing one device.
If the device that you scanned was already in Gaai’s database, you will see

Gaai will not let you create duplicates.
List of Devices
As soon as the database contains at least one device, Gaai shows a list of all registered devices at startup as shown in the next picture.
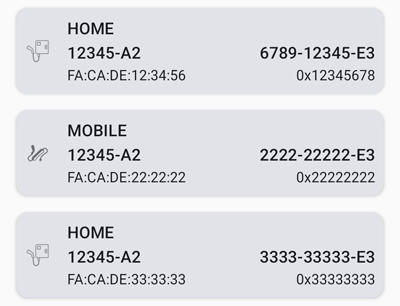
In this screen you can
- Add another device by clicking on the “+” button at the bottom right.
- Remove a device by swiping its card to the right.
- Connect to the device by clicking on its card. This will open the Device details screen. Make sure that you are close to the Nexxtender charger and that no other device is connected with it over BLE.
Device details
When clicking on a device card in List of Devices, Gaai tries to connect to the device and shows the following screen.
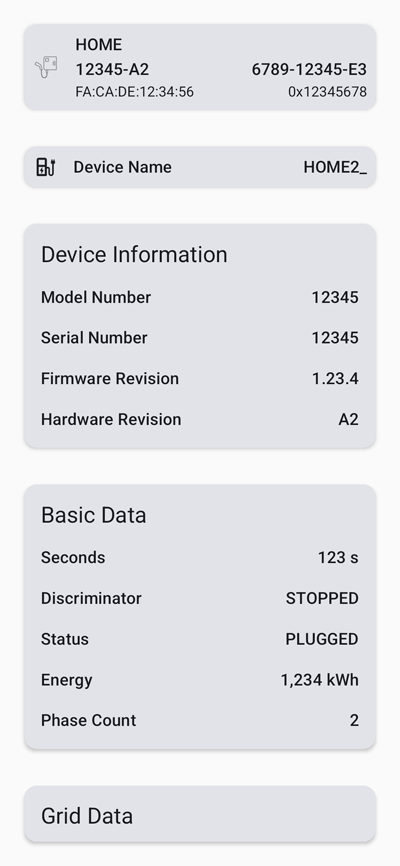
The complete screen is larger then the phone’s screen. You must scroll up to see the other parts. When the screen opens, only the labels are shown without data values. The values are populated as soon as Gaai has established the connection and read all the data. That can take 5 seconds. If no data appears after a few seconds, it might be that another BLE client is still connected to the device. It could also be a problem in Gaai. It is normally solved by going back to the previous screen using the left arrow at the top left of the screen, and try again.
The card on the top is the same one as from the List of Devices.
The next cards show the device name and the Device Information. These contain general BLE information, not specific for a Nexxtender charger.
The next cards contain specific Nexxtender charger information as reported by the device. The Nexxtender Home supports all cards. The Nexxtender Mobile only supports the Basic Data card.
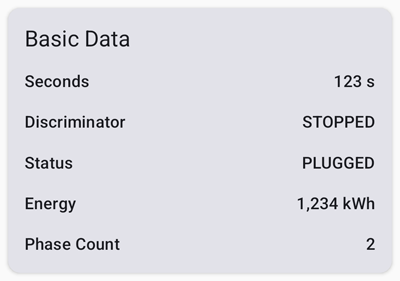
Basic Data
The Basic Data card shows Basic Nexxtender Home and Nexxtender Mobile charging data.
| Field | Description |
|---|---|
| Seconds | Number of seconds since start of charging |
| Discriminator | Possible discriminator states: STARTED, CHARGING, STOPPED |
| Status | Possible states: PLUGGED, CHARGING, FAULT |
| Energy | Total energy in kWh charged during this session |
| Phase count | Charging Phase Count |
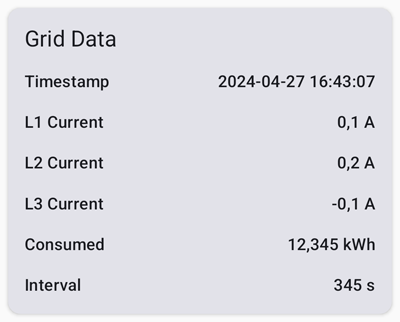
Grid Data
The Grid Data card shows Grid Data as measured by the Nexxtender Home. It is not supported by the Nexxtender Mobile.
| Field | Description |
|---|---|
| Timestamp | Current time |
| L1 Current | Grid phase L1 current |
| L2 Current | Grid phase L2 current |
| L3 Current | Grid phase L3 current |
| Consumed | Total grid power consumption in Wh during this quarter. Set to 0 when ‘‘interval’’ is set to 0. |
| Interval | Counts the seconds in the current quarter. Is set to 0 every multiple of a quarter (hh:00, hh:15, hh:30, hh:45) |
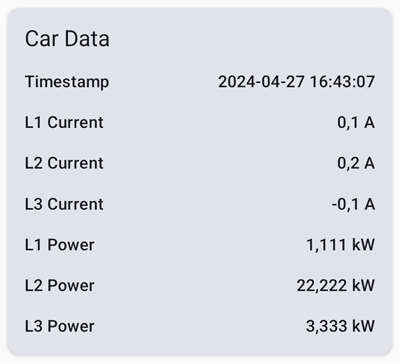
Car Data
The Car Data card shows Car Data as measured by the Nexxtender Home. It is not supported by the Nexxtender Mobile.
| Field | Description |
|---|---|
| Timestamp | Current time |
| L1 Current | Car phase L1 current |
| L2 Current | Car phase L2 current |
| L3 Current | Car phase L3 current |
| L1 Power | Car phase L1 power consumption |
| L2 Power | Car phase L2 power consumption |
| L3 Power | Car phase L3 power consumption |
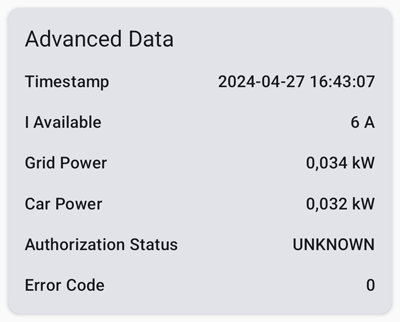
Advanced Data
The Advanced Data card shows Advanced Data as measured by the Nexxtender Home. It is not supported by the Nexxtender Mobile.
| Field | Description |
|---|---|
| Timestamp | Current time |
| I Available | Available current |
| Grid Power | Total power consumption from the grid |
| Car Power | Total power consumption by the car |
| Authorization Status | Possible states: UNAUTHORIZED, AUTHORIZED DEFAULT, AUTHORIZED ECO, AUTHORIZED MAX, CHARGE STOPPED IN APP, CHARGE PAUSED |
| Error Code | Error code returned by the Nexxtender Home |
Configuration
The Configuration card shows the data that can be configured in the Nexxtender Home.
It is not supported by the Nexxtender Mobile.
In theory all these fields are configurable and can be changed.
Gaai only allows to change the fields marked with  .
There are three different layouts, depending on the Firmware Version.
.
There are three different layouts, depending on the Firmware Version.
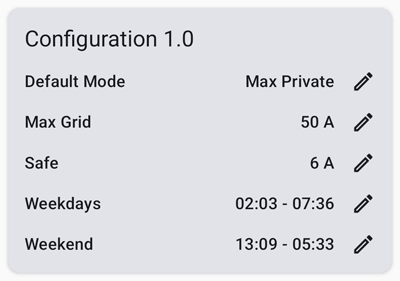
Configuration 1.0
This is the layout for Firmware Version below 1.1.0.
| Field | Description |
|---|---|
| Default Mode | Possible default charging modes: ECO_PRIVATE, MAX_PRIVATE, ECO_OPEN, MAX_OPEN |
| Max Grid | Maximum allowed grid consumption. Set this equal or smaller to the value of the main grid fuses. Set this to a lower value if you have a peak tariff contract |
| Safe | Minimum charging current for the device. Certified chargers are required to provide a minimum of 6A |
| Weekdays | Off peak period for week days |
| Weekend | Off peak period for weekend days |
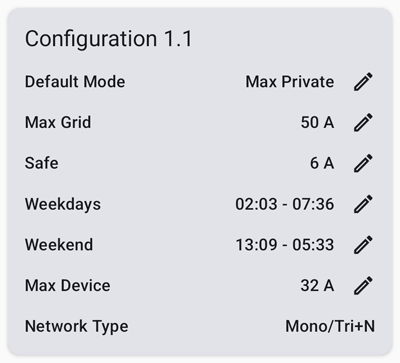
Configuration 1.1
This is the layout for Firmware Version from 1.1.0 to 3.50. The fields “Max Device” and “Network Type” are added compared to the 1.0 format.
| Field | Description |
|---|---|
| Default Mode | See Configuration 1.0 |
| Max Grid | See Configuration 1.0 |
| Safe | See Configuration 1.0 |
| Weekdays | See Configuration 1.0 |
| Weekend | See Configuration 1.0 |
| Max Device | Maximum allowed charging speed in A for the EV device. Safe <= Max Device <= Max Grid |
| Network Type | Mono/Tri+N or Tri |
For the field “Network Type” Gaai does not implement the option to change the value, as it is probably not wise to change this value if you don’t know what you are doing.
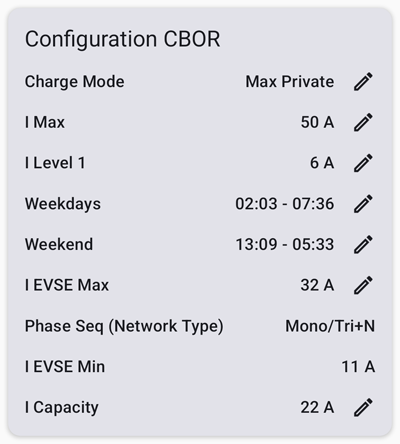
Configuration CBOR
This is the layout for Firmware Version above and including 3.50. The fields “I EVSE Min” and “I Capacity” are added compared to the 1.1 format. Most other fields from versions 1.0 and 1.1 have a different name in CBOR format.
| Field | Description |
|---|---|
| Charge Mode | See Default Mode in Configuration 1.1 |
| I Max | See Max Grid in Configuration 1.1 |
| I Level 1 | See Safe in Configuration 1.1 |
| Weekdays | See Configuration 1.1 |
| Weekend | See Configuration 1.1 |
| I EVSE Max | See Max Device in Configuration 1.1 |
| Phase Seq (Network Type) | See Network Type in Configuration 1.1 |
| I EVSE Min | Not used |
| I Capacity | Peak grid current limit. I Level 1 <= I Capacity <= I Max. You can set this to a lower value if you have a peak tariff contract. Configurations 1.0 and 1.1 behave as if I Capacity == Max Grid |
For the field “I EVSE Min” Gaai does not implement the option to change the value, as the value does not seem to be used by the Nexxtender Home.
Changing configuration
Clicking on next to “Default Mode”/”Charge Mode” gives the following
dialog screen:

Select the required default charging mode and press OK to confirm. OK is grayed out if the choice is still “Unknown”. Pressing Cancel does not change anything.
Note that setting the default mode to an ECO variant does not seem to have an effect. The Nexxtender charger does accept it, but if you start charging in ECO mode, it will activate MAX mode anyhow. The only way the start ECO mode is to explicitly start it with the Start Charge ECO button in the screen from section Loader. This seems to be an issue with the charger; I have the same issue when using the Nexxtmove app.
Clicking on next to any of the fields with a value expressed in A
gives the following dialog screen:
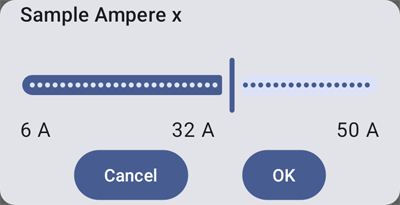
Select the required current value in Amperes using the slider and press OK to confirm. Pressing Cancel does not change anything.
Clicking on next to “Weekdays” or “Weekend”
gives the following dialog screen:
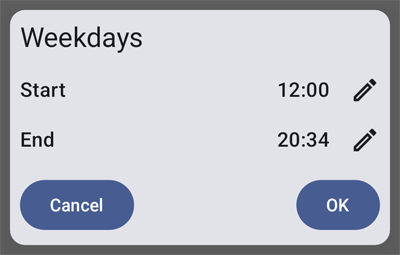
Change both Start and End times by clicking next to it.
A time picker dialog opens to select a time:
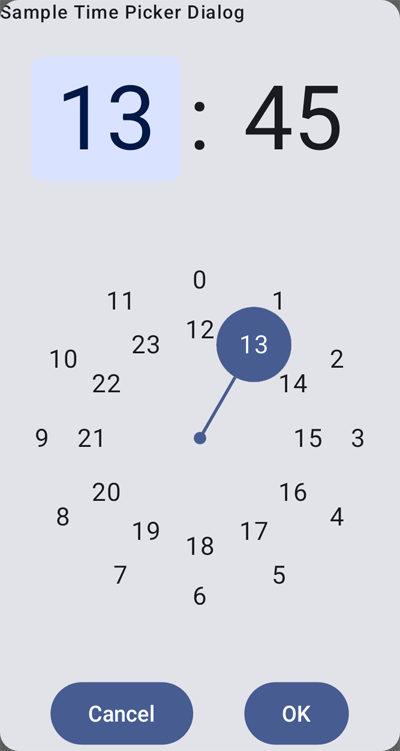
After changing the Start and End times, press OK to confirm. Pressing Cancel does not change anything.
Time
The Time card allows to sync the time of the Nexxtender Home with the time on the phone. It is not supported by the Nexxtender Mobile.
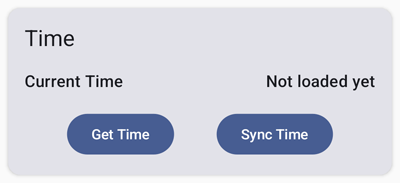
Clicking “Get Time” reads the current time from the Nexxtender Home.
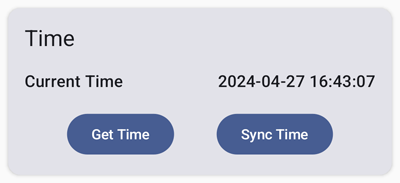
Clicking “Sync Time” writes the current phone time to the Nexxtender Home.
Loader
The Loader card allows to start or switch the Nexxtender Home to charge in a specific mode or to stop it. It is not supported by the Nexxtender Mobile.
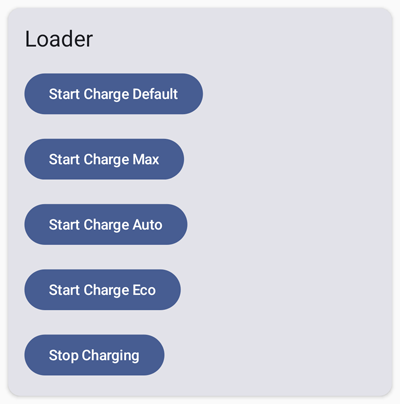
Click on a button and the Nexxtender Home immediately switches to the corresponding state.
Badges
The Badges card allows to go to the Badge list screen.

Click on the button to go to the Badge list screen.
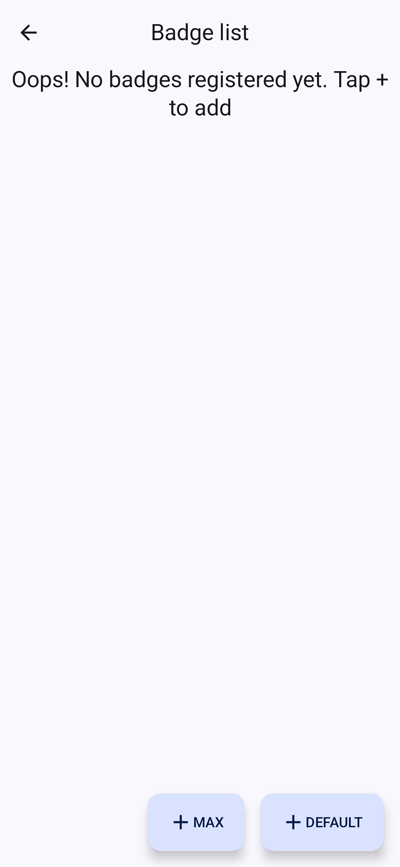
Badge list
This screen shows the list of RF badges registered by the charger. Gaai does not keep a database of registered badges; it only shows the live list as known by the charger. If there are no badges registered yet, the screen will look like:
If there are already badges registered, the screen will show them:
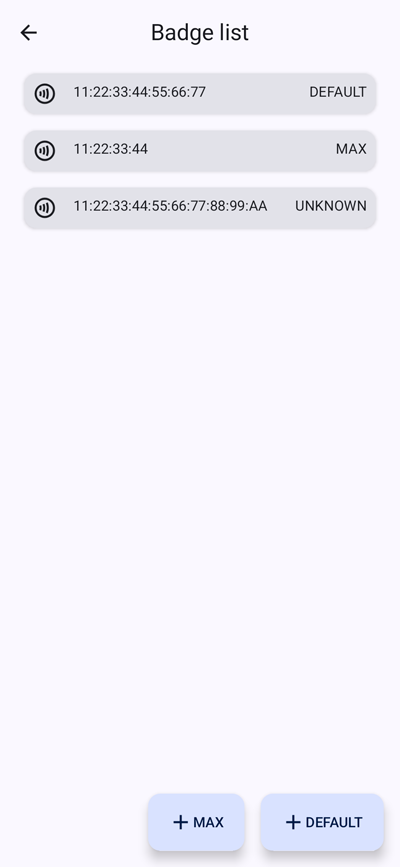
Each row shows 1 registered badge. Each badge has an ISO/IEC 14443-3 UID number that can either be 4, 7 or 10 bytes in length. Each badge also has a Charge Type that indicates if this badge will start charging in MAX mode or DEFAULT mode. The BLE protocol with the charger does unfortunately not report this Charge Type, so Gaai will report them as UNKNOWN.
In this screen you can
- Register another badge by clicking either the “+ DEFAULT” or “+ MAX” button at the bottom right to register the badge with the corresponding Charge Type. A message will be shown to hold the new badge against the charger. The charger will register the new badge and Gaai automatically updates its list of registered badges.
- Remove a device by swiping the card entry that corresponds with the badge to the right.
Make sure that you are close to the Nexxtender charger and that no other device is connected with it over BLE.
Links
Useful information can be found at
- Nexxtender Charger Information, Frank HJ Cuypers
- Analyzing-Bluetooth-Low-Energy-Traffic
- Wireshark Dissector in Lua for Nexxtender charger BLE
- ESPHome BLE Client for Powerdale Nexxtender EV Charger
- Nexxtmove for Home Assistant
- Nexxtender Home Bluetooth Controller
- Discord chat related to ESPHome BLE Client for Powerdale Nexxtender EV Charger and Nexxtmove for Home Assistant
License
This project is licensed under the GNU AGPLv3 License. See the LICENSE file for details.
Acknowledgements
- ESPHome BLE Client for Powerdale Nexxtender EV Charger showing how to address the Nexxtender Home.
- NordicSemiconductor Kotlin-BLE-Library uiscanner for the BLE library.
Supported Android versions and Nexxtender Home/Mobile firmware versions
In theory Gaai should work from API 26 (Android 8) and higher, but these are not all tested. For the Nexxtender Home firmware versions, there is insufficient documentation available to assess if it will work for older versions.
The following table shows the version combinations for which it was confirmed that it works. Basic scenarios seems to work, but further testing is required for other scenarios. The first row is the main combination used for testing and debugging during development. The other rows are confirmed by other users.
| Phone Model | Android API (version) | Nexxtender Home firmware version | Nexxtender Mobile firmware version |
|---|---|---|---|
| Google Pixel 6 Pro | 34 (14) | 2.53.2 | |
| Google Pixel 8 Pro | 35 (15) | 2.53.2 | |
| Nokia X10 | 34 (14) | 2.53.2 | |
| OnePlus Nord 2 | 33 (13) | 3.65.0 | |
| Samsung Galaxy J7 | 27 (8.1) | 3.65.0 |
There are currently no combinations for which it is confirmed that it does not work.
Disclaimer
The developer
- has no link with Powerdale nor Diego.
- developed this app without prior knowledge of most of the components and tools used developing it: Android app development, Android Studio, Gradle, Kotlin, Jetpack compose, BLE, …
- did not see any perturbing interactions with the Nexxtmove app. However, if you still need the Nexxtmove app to upload charging information (for reimbursement or others), be very careful as there is no guarantee that it will not interfere.
Gaai is only tested on a the phone versus Nexxtender Home/Mobile versions as indicated in section Supported Android versions and Nexxtender Home firmware versions
At this point Gaai should be considered an alpha app, for trials only. It is currently not tested on sufficient combinations, so please expect to spend the necessary debugging time. If despite the preceding warnings, you decide to use Gaai, that is on your own responsibility. But we will do our best to help you.